Monday, 11 July 2016

Removing Execution Plans from the Procedure Cache


To manually remove a single plan or all plans from the cache, we use DBCC FREEPROCCACHE (Transact-SQL).

Note: To all those who are not aware of what execution plan is, please go through the below links (Article may be bit lengthy, but till day no one has documented the way he(Grant Fritchey) did)

https://www.simple-talk.com/sql/performance/execution-plan-basics/
https://www.simple-talk.com/sql/performance/graphical-execution-plans-for-simple-sql-queries/

How SQL Server does this automatically for us?

Execution plans remain in the procedure cache as long as there is enough memory to store them.
When memory pressure exists, the Database Engine uses a "COST-BASED" approach to determine which execution plans to remove from the procedure cache.
To make a cost-based decision, the Database Engine increases and decreases a current cost variable for each execution plan according to the following factors.

1) When a user process inserts an execution plan(new query) into the cache, the user process sets the current cost equal to the original query compile cost;
for ad-hoc execution plans(ex: CTE query), the user process sets the current cost to zero. Thereafter, each time a user process references an execution plan, it resets the current cost to the original compile cost;
for ad-hoc execution plans the user process increases the current cost. For all plans, the maximum value for the current cost is the original compile cost.

2) When memory pressure exists, the Database Engine responds by removing execution plans from the procedure cache.
To determine which plans to remove, the Database Engine repeatedly examines the state of each execution plan and removes plans when their current cost is zero.
An execution plan with zero current cost is not removed automatically when memory pressure exists; it is removed only when the Database Engine examines the plan and the current cost is zero.
When examining an execution plan, the Database Engine pushes the current cost towards zero by decreasing the current cost if a query is not currently using the plan.

3) The Database Engine repeatedly examines the execution plans until enough have been removed to satisfy memory requirements.
While memory pressure exists, an execution plan may have its cost increased and decreased more than once.
When memory pressure no longer exists, the Database Engine stops decreasing the current cost of unused execution plans and all execution plans remain in the procedure cache, even if their cost is zero.

4) The Database Engine uses the resource monitor and user threads to free memory from the procedure cache in response to memory pressure.
The resource monitor and user threads can examine plans run concurrently to decrease the current cost for each unused execution plan.
The resource monitor removes execution plans from the procedure cache when global memory pressure exists. It frees memory to enforce policies for system memory, process memory, resource pool memory, and maximum size for all caches.

The following examples illustrate which execution plans get removed from the procedure cache:

An execution plan is frequently referenced so that its cost never goes to zero. The plan remains in the procedure cache and is not removed unless there is memory pressure and the current cost is zero.

An ad-hoc execution plan is inserted and is not referenced again before memory pressure exists. Since ad-hoc plans are initialized with a current cost of zero, when the database engine examines the execution plan, it will see the zero current cost and remove the plan from the procedure cache. The ad-hoc execution plan remains in the procedure cache with a zero current cost when memory pressure does not exist.

Where can I see plan cache information?

dbcc memorystatus; -- (requires sysadmin privileges)

The most advanced and much awaited feature to persist execution plans(even when we restarts SQL instance) introduced in SQL Server 2016.
Will come up with the Query Store features on the next article.

Monday, 4 July 2016

Delayed Durability in SQL Server 2014


Delayed Durability in SQL Server 2014

Firstly what is Delayed Durability?

We all aware of ACID property, the last letter in it is "D"[Durability] which brought this topic.

In SQL Server, changes to data are written to the log first. This is called write ahead logging (WAL).
Control isn't returned to the application until the log record has been written to disk (a process referred to as "hardening").
Delayed durability allows you to return control back to the application before the log is hardened.
This can speed up transactions if you have issues with log performance. Nothing is free, though, and here you sacrifice recoverability.
Should the database go down before the log is committed to disk, then you lose those transactions forever.

History behind Transaction Commit:

Whenever we commit the transaction(SQL Server is auto commit by default), log buffer data are the one which is first flushed into the disk
even before the original data[present in data buffer] into the physical disk. On completion of log flush into disk, all locks associated with the transaction will be released.
The transaction’s locks cannot be dropped until the log flush completes. So whenever log buffer entries made into the physical log files, transaction attains the final property of Durability.

Normal Transaction vs Delayed Durability Transaction 

Under normal circumstances, when a transaction commits, the commit doesn’t complete until the log block for the transaction has been flushed to disk.
Whereas in the case of delayed durability transactions are considered to be complete, even before log flush occurs.
Hence other transactions can acquire locks held by current transaction.

Scenario:

Think of a workload such as, all the other transactions are waiting for the one that is committing, as they all need the same locks, so Transactions/sec is tied to Log Flushes/sec in this case.

With delayed durability, the transaction commit proceeds without the log block flush occurring – hence the act of making the transaction durable is delayed.
Under delayed durability, log blocks are only flushed to disk when they reach their maximum size of 60KB.
This means that transactions commit a lot faster, hold their locks for less time, and so Transactions/sec increases greatly (for this workload).
You can also see that the Log Flushes/sec decreased greatly as well, as previously it was flushing lots of tiny log blocks and then changed to only flush maximum-sized log blocks.

Advantages/Benefits: 

By enabling the delayed durability, no of transactions per sec will be greatly improved.
Since other transactions doesn't need to wait for the current transaction till it is being logged.

Disadvantages: 

Your transactions aren’t durable when they commit. If the system crashes we will end up losing the transactions(though they are committed)
which is in the log buffer.

Key Notes:

Delayed Durability can be enabled at database level, COMMIT level, or ATOMIC block level in Natively Compiled Stored Procedures.
For more details please refer: https://msdn.microsoft.com/en-us/library/dn449490.aspx

Thursday, 12 May 2016

How to save query results into excel file with column names in mysql


Include headers when using SELECT INTO OUTFILE?


If you ever tried the above scenario, your solution is here.


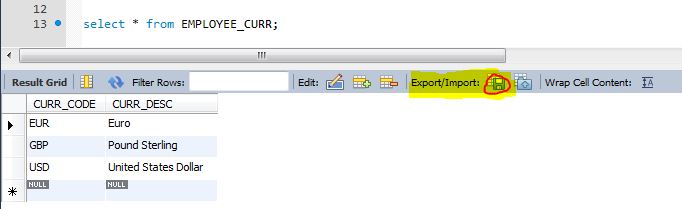
If you are using MySQL Workbench, you can achieve the same with the help of Export\Import icon in the query output window.

Please refer the image below for the same.

Execute the query which you would like to extract. Then click highlighted icon shown above

Browse desired path and choose Excel Spreadsheet as Save as type in File Dialog Box.


Tuesday, 10 May 2016

Snippets in SQL Server Management Studio(SSMS)


SQL Server Management studio offers simple snippets which helps to create objects of  the Database with ease without bothering much about the syntax of each object.

Snippets can be included in the query window either by browsing through
Edit->IntelliSense->InsertSnippet... or (Keyboard shortcut Ctrl K+X)

(or)

Edit->IntelliSense->SurroundWith..or (Keyboard shortcut Ctrl K+S)

Please have a look at the picture below for details of the above mentioned keyboard shortcuts.


Above picture shows the Begin End, If and While block Construct which you can include anywhere in the query window just by hitting the keyboard shortcut of Ctrl K+S.


Above picture shows the object creation template(table in the above case). By clicking on any of the listed object, respective construct will be shown for the user to edit.

Wednesday, 27 April 2016

Drop all temp tables(local and global) of a session in SQL Server.

Drop all temp tables(local and global) of a session in SQL Server.


Below code is helpful wherein you are not aware of the temp tables created in your current session.
When we debug the procedure,if that procedure doesn't have construct of DROP and CREATE.


DECLARE @DropGlobal bit=0 --Default dont drop global temp table
DECLARE @DROP_STATEMENT nvarchar(1000)
DECLARE cursorDEL CURSOR FOR
SELECT 'DROP TABLE '
   + case
           when name like '##%' then name
           when name like '#%' then SUBSTRING(name, 1, CHARINDEX( '____', name)-1)
    end as DropSQL
from tempdb..sysobjects
WHERE name LIKE '#%'
   AND OBJECT_ID('tempdb..' + name) IS NOT NULL
   AND name not like case
                       when @DropGlobal=0 then '##%' --//Exclude global temp
                       else '#######%'    --//some fack expression so we can
                                           --//select global temp for delete
                    end

   --//eventhough we have selected all records from sysobjects
   --//but one can access only temp table created by same connection
   --//executing this procedure

OPEN cursorDEL
FETCH NEXT FROM cursorDEL INTO @DROP_STATEMENT
WHILE @@FETCH_STATUS = 0
BEGIN
--EXEC (@DROP_STATEMENT)
print @DROP_STATEMENT
FETCH NEXT FROM cursorDEL INTO @DROP_STATEMENT
END
CLOSE cursorDEL
DEALLOCATE cursorDEL


Monday, 25 April 2016

Find Dependent objects related to TableName in SQL Server.


Below query will fetch you the list of dependent objects(SP or Views or Functions) for the given tablename:


SELECT B.NAME as OBJECT_NAME,A.[DEFINITION],B.TYPE_DESC
FROM SYS.SQL_MODULES A
JOIN SYS.OBJECTS B
ON A.OBJECT_ID = B.OBJECT_ID
WHERE A.DEFINITION LIKE '%F_PARTY_TRANCHE_ROLE%'


Note: sys.syscomments comes under deprecated system table, so in the above query i used sys.sql_modules which Microsoft recommends for future development.


Friday, 25 March 2016

Parent Package Variable in SSIS


Parent Package Variable in SSIS

There are situations wherein you need value which is assigned to variable in one package to be used in other package.

There exist a way in SSIS to access a variable defined in one(Parent) package and utilized in other(Child) package.

Just visualize a scenario where you have a Parent Package and "n" number of child packages.Through Execute Package task you are calling all child's from Parent.

All child packages should get values from Parent package.(Values can be "Server name or DB_Name")

When we want to make use of variable values which is defined and assigned in other package(let's say Parent), the place we need to target is Child Package.

Configuration Steps as follows:

1) Go to the package(child),right click anywhere in the Control Flow Designer Area and choose Package Configuration.

2) "Package Configurations Organizer" window will pop up, click on Check-box "Enable Package Configuration" which enables "ADD" button.Click Add.

3) Package Configuration Wizard(welcome page) will launch, just Click Next. (You may or may not come across this Welcome page).

4) Now when you click Next, Select Configuration Type wizard appears.

5) From the Configuration Type drop down(defaults to XML configuration file), choose Parent Package Variable.

6) Now we have reached the most important step of this article, which is nothing but defining the Parent Variable.

7) In this place, we need to give Variable Name from which we are going to pull out values. (Parent package Variable Name).
   Note: Variable Name is case sensitive and hence you need to use the same name defined in Parent Package. We all set, to assign value to the variable in the Child package.

8) Click Next, Select Properties to Export window will appear.
9) Click on Variable Name,expand Properties and click on "Value" property.
10)Click Next, Completion wizard will summarize the configuration. Click on Finish.

Now whatever value assigned to Parent Package Variable will be assigned to Child Package during run time.

Best example, i can think of is, let's say you developed package in dev environment(with OLEDB in Parent and all Child's). Time has come to move to UAT or SIT then instead of changing OLEDB connection in each and every child package if we change in Parent Package, that will be reflected in Child Package(provided your servername and dbname are configurable through expressions with variables).